GitHub is a web-based GIT repo for version control system. This tutorial is for the beginners, who are about to use git / github.
GitHub is mostly like an social media, where you can build your profile, upload projects, share it and connect with other users by following their accounts, contributing to other project by forking it, adding features and commit it back to original source and so on.

My GitHub Page
I am not a frequent user of Github, but I use git a lot. Git is a core of GitHub, used to manages the source code without overwriting any part of the project. At any point of time, you can revert back your changes.
Few terms you need to understand before diving in:
Repo: A directory or storage space where your projects resides. Sometimes GitHub users shorten this to “repo.” It can be local to a folder on your computer, or it can be a storage space on GitHub or another online host. You can keep code files, text files, image files, you name it, inside a repository.
Version Control: For example, if you have a Word file, you either overwrite every saved file with a new save, or you save multiple versions. With Git, you don’t have to do it. It keeps “snapshots” of every point in time in the project’s history, so you can never lose or overwrite it.
Commit: When you commit, you are taking a “snapshot” of your repository at that point in time, giving you a checkpoint to which you can reevaluate or restore your project to any previous state.
Branch: If multiple people work on same project, they take a “branch”of the main project “master”, do their changes and then “merge” that branch back with the “master”.
Git Installation:
To install git, use the following command.
$ sudo apt-get install git
$ yum install git
$ pkg_add git
Download the executable file from http://git-scm.com/download/win
Git Commands:
After installing git, type “git” in the command-line to see its usage and list of commands.

List of Git commands
There are quite a few import git commands we use most frequently, they are,
git init: Initializes a new Git repository. Until you run this command inside a repository or directory, it’s just a regular folder. Only after you input this does it accept further Git commands. It also creates a .git folder inside it.
git config: Short for “configure,” this is most useful when you’re setting up Git for the first time.
git help: Forgot a command? Type this into the command line to bring up the 21 most common git commands. You can also be more specific and type “git help init” or another term to figure out how to use and configure a specific git command.
git status: Check the status of your repository. See which files are inside it, which changes still need to be committed, and which branch of the repository you’re currently working on.
git add: This does not add new files to your repository. Instead, it brings new files to Git’s attention. After you add files, they’re included in Git’s “snapshots” of the repository.
git commit: Git’s most important command. After you make any sort of change, you input this in order to take a “snapshot” of the repository. Usually it goes git commit -m “Message here.” The -m indicates that the following section of the command should be read as a message.
git branch: Working with multiple collaborators and want to make changes on your own? This command will let you build a new branch, or time-line of commits, of changes and file additions that are completely your own. Your title goes after the command. If you wanted a new branch called “mybranch,” you’d type git branch mybranch.
git checkout: Literally allows you to “check out” a repository that you are not currently inside. This is a navigational command that lets you move to the repository you want to check. You can use this command as git checkout master to look at the master branch, or git checkout mybranch to look at another branch.
git merge: When you’re done working on a branch, you can merge your changes back to the master branch, which is visible to all collaborators. git merge mybranch would take all the changes you made to the “mybranch” branch and add them to the master.
git push: If you’re working on your local computer, and want your commits to be visible online on GitHub as well, you “push” the changes up to GitHub with this command.
git pull: If you’re working on your local computer and want the most up-to-date version of your repository to work with, you “pull” the changes down from GitHub with this command.
We will see the usage of the above commands practically in the following sections.
Configuring GitHub:
First, create an account in GitHub, and then follow the steps.
Step 1: config
we need to setup the user-name and user-email parameters. To do it,
$ git config –global user.name “<Your Name>”
$ git config –global user.email “<Your E-mail same as in GitHub account>”

git config user.name, user.email
E-mail should be the same email that you had used in GitHub account.
Step 2: Creating a Repo
Online repo creations – In GitHub:
- In GitHub profile page, select the “Repositories” tab and click “New” button.

Repository Creation Step 1
- Then, In the repository creation page, specify the name of your repository, descriptions, access parameters like public or private (Private is not Free), which licence and also you have an option to create Readme files.

Repository Creation Step 2
- After repo creation, you will see the “Project page” as below.

Project page
Local Repo Creation – In your PC:
We had made a github project to live online, but that’s not where we’ll be working. The bulk of your work is going to be done on your computer. So we need to actually mirror that repository to a local directory.

Initializing Git
- Initialize Git. To do that create a folder and run init command.
- $ mkdir Designs
- $ cd Designs
- git init
- After you initialize git, a .git folder will be created which allows you to run all git commands.
- Add some contents inside the folder.
- We are on the master branch of the project, which makes sense since we haven’t “branched” of it. Secondly, the files that we added are “untracked” files, which means Git is ignoring it for now. To make Git notice that the file is there, then we need to add it by,
- After adding our files, we need to take a “snapshot” of the project so far by “committing” it:
- $ git commit -m “<Message for your understanding>”
Refer the following screenshot for the above commands and the usage of “git status”

git Init, git status, git commit
Step 3: Sync the local repo with Online repo (GitHub)
- First, we need to tell Git that a remote repository actually exists in Github. Goto that github page, copy the URL and add .git to the end of the url and parse it to “git remote add” command.

git remote
- To confirm,whether git identifies the remote repository, type the following command to check:
$ git remote -v
- This command gives you a list of all the remote origins your local repository knows about. Until now we have only Designs.git that we just added. It’s listed twice, which means it is available to push information to, and to fetch information from.
- Git push – Its time for us to push our changes to GitHub. This can be done by,

git push error
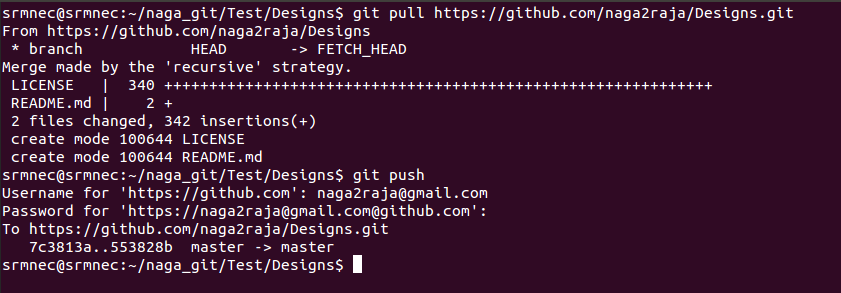
- If you get any error messages like mentioned in the side screen-shot, then just pull it first and then push it.
- You need to give the credentials of the GitHub account while pushing the data into your account.

git pull and git push
- After you pushed the changes successfully, you can see your files in the GitHub project page.

After pushing the files to GitHub
Thats All Folks !!! We will meet in the next tutorial of git about forking the existing repositories from GitHub, adding some features and commit back to GitHub.